


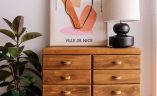
Staining wood using a pattern, I know it sounds random but I just had to give it a go!
I’ve seen quite a few pieces of furniture recently where 2 different wood is used to make a beautiful pattern and I wanted to recreate this look, without the effort and the cost (I saw a similar one for over $5,000!). I thought this was going to be harder than it was, but to my surprise, a little bit of painter’s tape and Feast Watson stain did the trick and created a beautiful striped pattern on the front.

Materials:
- Cabinet (I used this one)
- Feast Watson stain
- Feast Watson stain reducer
- Feast Watson varnish
- Orbital sander
- Nano blade or jigsaw
- Sponge and rag
- Brush
- Painter’s tape
- Fine grit sanding block
- Cardboard cylinders
- Self adhesive wood sheets
Before & after


How to Make a Patterned Stained Cabinet:
1
First, I prepared the cabinet for staining by sanding it using increasingly fine grit sanding paper, I wanted it to be really smooth so the stain went on well and didn't bleed too much.

2
Next, I mixed the Feast Watson teak brown stain with the Feast Watson reducer (50/50) to create a lighter colour. I then used a sponge and rag to stain the whole cabinet, inside and out, with this colour.

3
Once the stain had dried, I used painter's tape to mark out the striped pattern on the doors of the cabinet.

4
After this, I used a sponge and rag to stain the lines on the front created by the tape. I made sure I didn't have too much stain on my sponge and rubbed it in gently with a rag around the tape edges to avoid the stain bleeding.

5
Whilst the stain was still wet, I removed the painter's tape, leaving the beautiful pattern behind.

6
I left the stain to dry and then added a coat of Feast Watson satin clear timber weatherproof varnish to the whole cabinet with a brush.

7
After this, I laid the self adhesive wood sheets out and used a sponge to stain them in Feast Watson teak brown.

8
I then used some of the stained self adhesive wood sheets to stick in to the cabinet to cover the backing. I lined them up so the grain matches.

9
Now it was time to create the legs. I did this by cutting a cardboard cylinder down in to four 21cm lengths.

10
Next up, I screwed in some small wooden pieces in to the cardboard cylinders so that I can attach them to the base of the cabinet by screwing down from inside.

11
Finally, I carefully used the wood sheets to wrap the cardboard cylinder legs. I just cut, peel, stick and trimmed. I then attached the legs to the bottom of the cabinet. Honestly I can't believe how well these worked!


